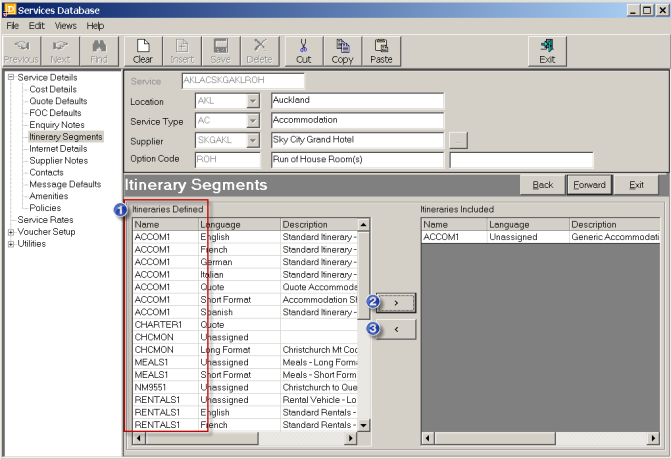
This screen enables one or more segments of pre-defined Itinerary text (which can include graphics) to be attached to Service Options. Itinerary segments must first have been defined in CodeMaint/Database/Itinerary Segments. (See Tourplan System Setup Training Guide).
Screen Shot 36: Add New Option Wizard – Itinerary Segments Screen

 To attach an itinerary segment first highlight the required segment in the Itineraries Defined list.
Then click this button  to copy the segment to the Itineraries Included list.
Note in the example in Screen Shot 36: Add New Option Wizard – Itinerary Segments Screen above that there are three Itinerary Segments with the same code (ACCOM1). They are ‘separated’ by the Language Code and this means that a quote or booking using this service can have an itinerary output in Quote Format, Short Format or the ‘Unassigned (Long) Format.
To remove an itinerary segment from the already attached list, click this button  .
.
The order in which the segments are listed in the Itineraries Included list determines the order in which they will be output on Tourplan documentation and messages.
|
|
In the list of available Itinerary Segments in the ‘Itineraries Defined’ column, there are an additional 7that have the name ACCOM1, but which have different language codes. These all must be attached if itineraries are going to be output using different language codes. |
To view the details of an Itinerary Segment, highlight then double click it.
Forward
To continue setting up the Service, click the ‘Forward’ button on the Wizard bar. This will display the Contacts Screen.
Exit
To cancel setting up the Service click the ‘Exit’ button on the Wizard bar.
Back
If any item on previous screens needs correcting, use the ‘Back’ button on the Wizard bar.
|
|
The observant will have noticed that two Side Bar Menu items have been skipped to get to the Contacts Screen - Internet Details and Supplier Notes. Internet Details will only display if Tourplan is configured for the iCom Internet Bookings System, and training will be given on this screen setup during iCom setup. Supplier Notes do not display at this time because they are initially configured during Adding a Supplier. |
(continued in Contacts Screen)