
The setting up of GL Accounts and their use is covered in the Accounts Training Guide–1. The examples above are to show how Branch & Departments are used.
Tourplan enables multiple Branch/Department GL account coding. The terms Branch and Department have become somewhat ingrained through historic usage, but they mean that there can be two distinct levels of GL account setup. Each combination can be viewed simply as being a Profit Centre.
For example, for Revenue, the account number may be 100000, but that number can represent different business revenue areas, by way of the Branch and Department fields. In a simple example, a Tour Operator may be running F.I.T.s, Groups and Series tours. GL accounts for Tour Revenue could be set up in the GL Chart of Accounts as follows:
Table 3: Tour Revenue Account Setup–1
|
Branch |
Dept. |
Account |
Description |
|
TL |
FT |
100000 |
FIT Revenue |
|
TL |
GP |
100000 |
Group Revenue |
|
TL |
SE |
100000 |
Series Revenue |
The TL indicates that the revenue is all from Tours (TL = Tours Ledger), The FT, GP and SE indicate the business areas FIT, Groups and Series. The account number (100000) is consistent over all branch and department combinations.
The Booking Reference numbers in Tourplan are also made up with the same Branch and Department structure, which enables the system to be able to post revenue and expenses automatically based on the booking reference Branch and Department.
If there are debtors who are invoiced for different business areas—e.g., the company owned rental property, then the chart could be setup as:
Table 4: Revenue Account Setup–2
|
Branch |
Dept. |
Account |
Description |
|
TL |
FT |
100000 |
FIT Revenue |
|
TL |
GP |
100000 |
Group Revenue |
|
TL |
SE |
100000 |
Series Revenue |
|
AD |
01 |
100000 |
No. 1 Property–Rent |
The AD indicates the revenue is an Administration or non-trading revenue item, and the 01 indicates property number one.
|
|
The setting up of GL Accounts and their use is covered in the Accounts Training Guide–1. The examples above are to show how Branch & Departments are used. |
|
|
On initial entry to the Branch node, any existing records will display. |
Screen Shot 112: Branch Codes Scroll
|
|
The column headings at the top of the scroll are the only column headings available in this screen. |
To modify an existing Branch Description or availability, highlight the row and double click.
To delete an existing Branch, highlight the row and click the Delete button in the button bar.
|
|
The Code field cannot be changed. Departments cannot be deleted if they have been used in Bookings, GL Account Setup, Commission/Discount structures, Debtor or Creditor transactions or GL Journal transactions, Debtors Receipt Types, Creditor Payment Types, Debtor Currencies, Creditor Currencies, and Bank Reconciliation Setup. |
To create a new Branch, click the Insert button in the button bar.
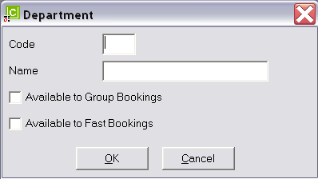
Screen Shot 113: Branch Setup Dialogue
Code (2 Chars)
A code for the Branch.
Name (30 Chars)
The Branch Description.
Available to Group Bookings (Checkbox)
If the branch is to be available in the Group Bookings application as a valid Booking Reference Branch, then check this box. Otherwise leave unchecked.
Available to Fast Bookings (Checkbox)
If the branch is to be available in the Fast Book (FIT Bookings) application as a valid Booking Branch, then check this box. Otherwise leave unchecked.
Screen Shot 114: Completed Branch Code Dialogue
|
|
Being able to selectively allow a branch code to be used for either Group or Fastbookings or both means that the likelihood of an incorrect branch being used in bookings is minimised. In the example shown in Screen Shot 114: Completed Branch Code Dialogue, the Administration Branch has been flagged as not being available for either Group Bookings or FastBookings (i.e., both checkboxes are unchecked). This means that when a consultant in either of those booking modules is choosing the Branch Code to apply as the first part of the Booking Reference, the branch AD will not display on the list of available branches. |
OK
Click the OK button to save the Branch record.
Cancel
Click Cancel to canel setting up the Branch record, or to return to the scroll.
|
|
On initial entry to the Department node, any existing records will display. |
Screen Shot 115: Department Codes Scroll
|
|
The column headings at the top of the scroll are the only column headings available in this screen. |
To modify an existing Department Description or availability, highlight the row and double click.
To delete an existing Department, highlight the row and click the Delete button in the button bar.
|
|
The Code field cannot be changed. Departments cannot be deleted if they have been used in Bookings, GL Account Setup, Commission/Discount structures, Debtor or Creditor transactions or GL Journal transactions, Debtors Receipt Types, Creditor Payment Types, Debtor Currencies, Creditor Currencies, and Bank Reconciliation Setup. |
To create a new Department, click the Insert button in the button bar.
Screen Shot 116: Department Setup Dialogue
Code (2 Chars)
A code for the Department
Name (30 Chars)
The Department Description.
Available to Group Bookings (Checkbox)
If the department is to be available in the Group Bookings application as a valid Booking Department, then check this box. Otherwise leave unchecked.
Available to Fast Bookings (Checkbox)
If the Department is to be available in the Fast Book (FIT Bookings) application as a valid Booking Department, then check this box. Otherwise leave unchecked.
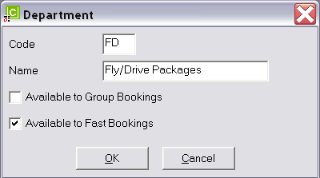
Screen Shot 117: Completed Department Code Dialogue
|
|
Being able to selectively allow a Department code to be used for either Group or Fastbookings or both means that the likelihood of an incorrect department being used in bookings is minimised. In the example shown in Screen Shot 117: Completed Department Code Dialogue Screen Shot 117: Completed Department Code Dialogue, the Fly/Drive Packages Department has been flagged as not being available for Group Bookings. This means that when a consultant in Group Bookings is choosing the Department Code to apply as the second part of the Booking Reference, the Department FD will not display on the list of available departments. |
OK
Click the OK button to save the Department record.
Cancel
Click Cancel to cancel setting up the Department record, or to return to the scroll.
It is necessary to define the number of accounting periods in each accounting year before any Bookings, Agents or Suppliers and accounting transactions can be entered into Tourplan.
The Bookings modules (FastBook and Groupbook) allow production of Invoices to agents. The Invoice generation program needs to know the accounting period the Invoice is being raised in, the period the revenue is to post to, the period the revenue is to age to and the period of the Date Entered. For this reason, the calendar must be set up as a prerequisite to any use of the system—whether full accounting is being used or not.
The basis of the calendar is the user companies accounting financial year. The majority of companies account each month; i.e., 12 one month periods.
The calendar periods are in the form YYYYNN where YYYY is the Financial Year (e.g. 2010), and NN is the accounting period in that year (e.g. 01). 01 does not necessarily refer to January, unless your financial year is the same as the calendar year. Taking the year 2011 as an example, the following are the period numbers and dates for the three most common financial years:
|
Period |
01 Jan–31 Dec |
01 Apr–31 Mar |
01 Jul–30 Jun |
|||
|
201101 |
1-Jan-11 |
31-Jan-11 |
1-Apr-10 |
30-Apr-10 |
1-Jul-10 |
31-Jul-10 |
|
201102 |
1-Feb-11 |
28-Feb-11 |
1-May-10 |
31-May-10 |
1-Aug-10 |
31-Aug-10 |
|
201103 |
1-Mar-11 |
31-Mar-11 |
1-Jun-10 |
30-Jun-10 |
1-Sep-10 |
30-Sep-10 |
|
201104 |
1-Apr-11 |
30-Apr-11 |
1-Jul-10 |
31-Jul-10 |
1-Oct-10 |
31-Oct-10 |
|
201105 |
1-May-11 |
31-May-11 |
1-Aug-10 |
31-Aug-10 |
1-Nov-10 |
30-Nov-10 |
|
201106 |
1-Jun-11 |
30-Jun-11 |
1-Sep-10 |
30-Sep-10 |
1-Dec-10 |
31-Dec-10 |
|
201107 |
1-Jul-11 |
31-Jul-11 |
1-Oct-10 |
31-Oct-10 |
1-Jan-11 |
31-Jan-11 |
|
201108 |
1-Aug-11 |
31-Aug-11 |
1-Nov-10 |
30-Nov-10 |
1-Feb-11 |
28-Feb-11 |
|
201109 |
1-Sep-11 |
30-Sep-11 |
1-Dec-10 |
31-Dec-10 |
1-Mar-11 |
31-Mar-11 |
|
201110 |
1-Oct-11 |
31-Oct-11 |
1-Jan-11 |
31-Jan-11 |
1-Apr-11 |
1-May-11 |
|
201111 |
1-Nov-11 |
30-Nov-11 |
1-Feb-11 |
28-Feb-11 |
1-May-11 |
31-May-11 |
|
201112 |
1-Dec-11 |
31-Dec-11 |
1-Mar-11 |
31-Mar-11 |
1-Jun-11 |
30-Jun-11 |
|
201113 |
|
|
|
|
|
|
|
201114 |
|
|
|
|
|
|
|
201115 |
|
|
|
|
|
|
|
|
Where a Financial Year spans a calendar year, then it is normal that the Tourplan Calendar Year be the year of the Financial Period end. The cells in that are shaded and text is bolded in the columns 01-Apr-31 Mar and 01-Jun-30 Jul in Table 5: Calendar Periods Table 5: Calendar Periods reflect that the financial year begins in the 2010 calendar year and ends in the 2011 calendar year. |
|
|
Up to 15 Calendar Periods may be specified, but this should only be done on the advice of Tourplan Support. This facility enables a user company to change their balance date. |
|
|
It is not uncommon for some companies to have their accounting periods in line with Airline accounting periods which generally consist of 13 four weekly periods, rather than 12 calendar month periods. |
|
|
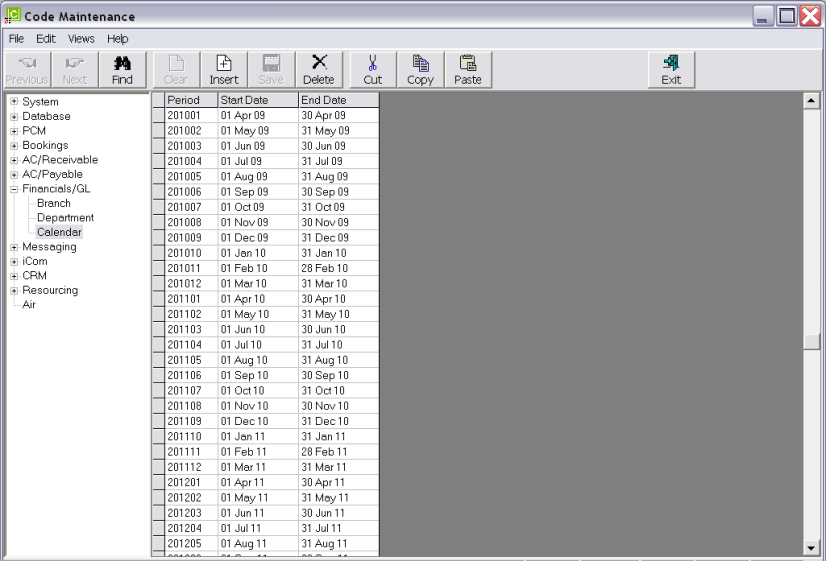
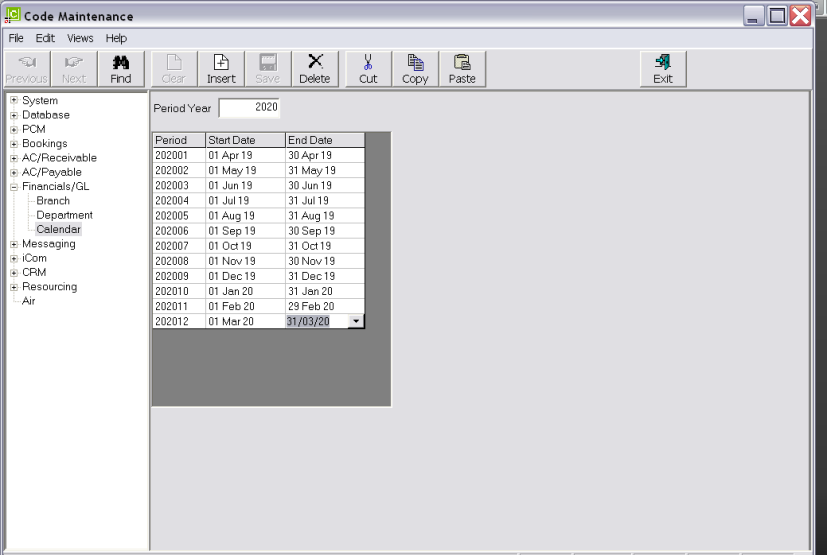
On initial entry to the Calendar node, any existing records will display. |
Screen Shot 118: Financial Year Calendar Scroll
|
|
The column headings at the top of the scroll are the only column headings available in this screen. |
|
|
The calendar in this example system actually commences with the 2001 financial year which begins on 01 Apr 2000 and terminates at the end of the 2020 financial year on 31 Mar 2020. Periods can be viewed a screenful at a time by dragging down the Scroll bar on the right hand side of the screen. |
|
|
Start Dates cannot be modified. Changing an End Date will adjust the Start Date of the next period. |
|
|
Changing Calendar Dates can have a significant impact on the validity of the financial transactions in a Tourplan system. Calendar dates should not be changed without first consulting the local Tourplan support office. |
|
|
Individual periods within a year cannot be deleted. Selecting a period within a financial year and clicking the delete button will delete all periods for that financial year. |
To add a new Financial Year, click the insert button in the button bar.
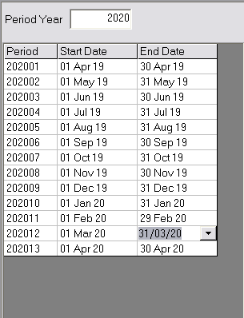
Screen Shot 119: Calendar Setup Screen
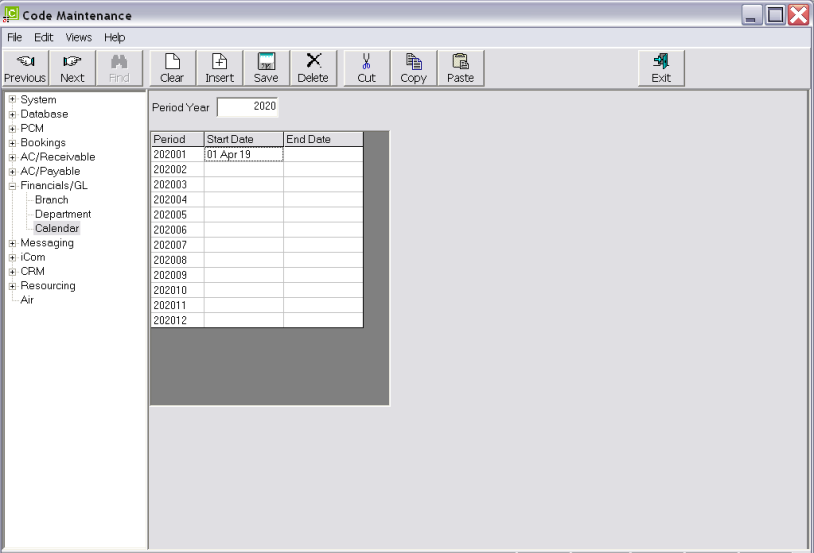
The 2020 Financial Year is the next to be added in this system.
Period Year(4 Int)
Enter the next year to be entered into this field.
Start Date (Date)
Provided the year entered in the Period Year field is the next consecutive year, the start date will automatically default to the last saved period plus one day—i.e., 01 Apr 2019.
End Date (Date)
Clicking in the End Date field for the first period in this financial year (202001), will default the last day of the month (April 2020) in the form of a drop down calendar. This enables the end date to be changed if required. If no change is needed, simply press enter through all fields in the End Date column and the Month End dates will auto complete.
Screen Shot 120: Completed Calendar Year
Click the Save button in the button bar to save the changes.
|
|
The default number of periods available is 12. If additional (up to a total of 15) period(s) are required, click the Insert button in the button before clicking the Save button to save the periods. |
To add additional calendar years, click Calendar node in the side bar to re-display the full list of calendar periods, and then click the Insert button in the button bar.
(continued in Messaging Setup)
 Tourplan iS V2.07 System Setup Training Guide