Open topic with navigation
(continued from Currency Rates)
Users
|

|
There are two programs in Tourplan where users can be defined—CodeMaint (this section) and Security Definitions.
In both cases, the User Setup screen is identical. In Security Definitions, the wider functions of setting up user groups, and applying security levels to applications and processes can also be done. In CodeMaint, users can be created, and have Groups (which must have previously been created via Security Definitions) applied against them.
|
|
|
On initial entry to the Users node, any existing records will display.
|
Screen Shot 12: Users Scroll
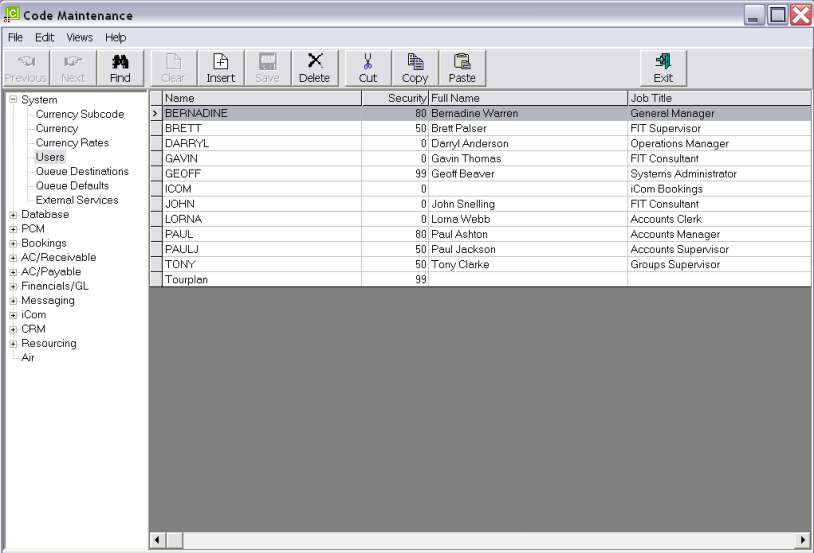
To edit an existing user’s details, double click the row.
To delete an existing user, highlight the row and click the Delete button in the button bar.
To add a new user, click the Insert button in the button bar.
|
|
All column headings at the top of the scroll display by default in this screen. Some are hidden in the standard screen size mode. A list of all available columns in this screen can be found under the heading Users Scroll.
|
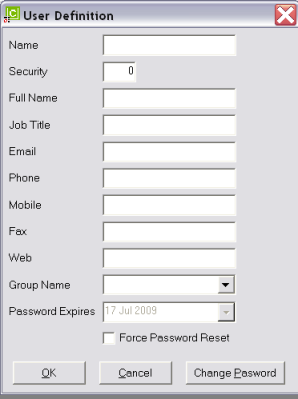
Screen Shot 13: User Definition Dialogue
|
|
With the exception of the Security level, all of the fields in this screen can be output on messaging/documentation if required.
|
Name (30 Chars, Forced Caps)
Enter the user login name. This is the name that the user logs on to Tourplan with.
|
|
It is preferable, but not necessary for User names to be unique — there can be multiple persons logged into Tourplan all using the same name.
|
|
|
Each Tourplan system is licensed for a maximum number of concurrent users being able to access the system. The maximum number of concurrent users is displayed on the Tourplan log in screen. This does not mean that the maximum number of user names that can be set up is the same as the number of concurrent users the system is licensed for. As many user names as are required can be set up; the limit is how many of those users are logged into Tourplan at any particular time.
|
Security Level (Numeric 2.0)
Enter the numeric security level value for the user (if required). This can be a value between 0 and 99. Each item on Tourplan menus (and the menu nodes within each application) can have a security level number which then determines the individual user’s rights to access that particular menu item. Further details on the setting of system/menu security levels, is detailed in the Securities Overview section.
Full Name (100 Chars)
The user’s full name (forename and surname) can be entered in this field.
Job Title (100 Chars)
The user’s job title can be entered in this field.
|
|
There is a case for entering the users forename in the Full Name field, (not in caps as per the login name), and the users Surname in the Job Title field if this is not going to be used for the Job Title. The rationale being that on some messages/documentation, the Forename only is output and on others, the Forename and Surname is required.
|
Email (100 Chars)
Enter the users email address in this field. This is used as the From email address when outputting Tourplan generated messages to email.
Phone (100 Chars)
Enter the users Phone number. This is information only and can be output on documentation.
Mobile (100 Chars)
Enter the user’s Mobile number. This is information only and can be output on documentation.
Fax (100 Chars)
Enter the users Fax number. This is information only and can be output on documentation.
Web (100 Chars)
Enter the users web URL. This is information only and can be output on documentation.
Group Name (Drop-down)
If Groups have already been created in the Security Definitions application, select the applicable group name from the drop-down. Setting up groups is detailed in the Securities Overview section. If groups have not been set up, leave this field blank.
Password Expires (Date)
This will always a) default to today’s date and b) be dimmed out. When a new user has logged in and selected a password that does not have a forced reset, this date will display 31 Dec 2050 when the user is selected from this scroll list.
Force Password Reset (Checkbox)
When checked, the user will be required to change their password at the next log on.
Change Password (Button)
When clicked, the Change Password dialogue displays.
Screen Shot 14: Change Password Dialogue
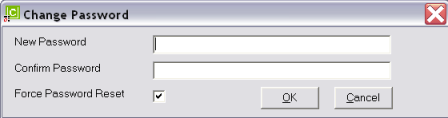
New Password (10 Chars)
Enter the new password.
|
|
The new password must be different to the existing password.
|
Confirm Password (10 Chars)
Re-type the new password to confirm it.
OK
Click the OK button to complete.
Cancel
Click Cancel to cancel setting up the new password, or to return to the scroll.
When the new password has been accepted, the User Definition dialogue (Screen Shot 13: User Definition Dialogue) will re-display.
OK
Click the OK button to save the user detail.
Cancel
Click Cancel to cancel setting up the new user, or to return to the scroll.
(continued in Queue Destinations)
Open topic with navigation
