 in the Button bar. From the Insert Transaction screen displayed, select Invoice.
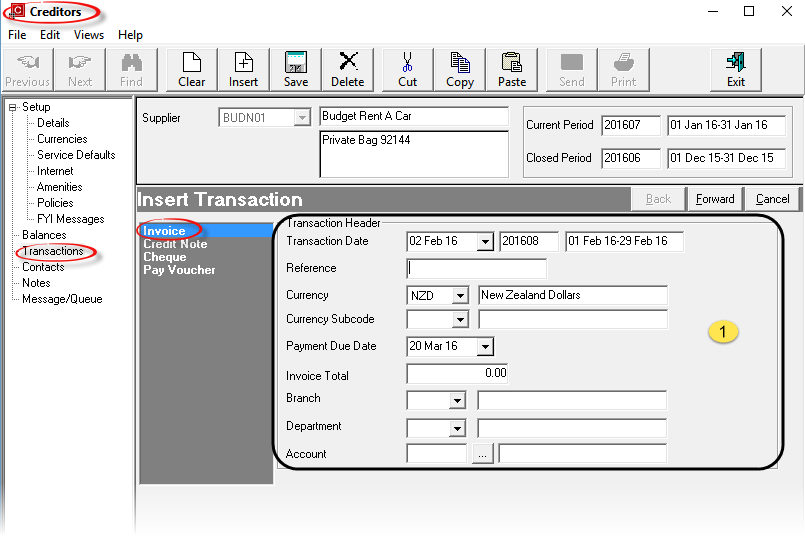
To insert a Creditors Invoice, first select the Creditor the invoice has been received from, and then select Transactions in the side bar. Click on the Insert button  in the Button bar. From the Insert Transaction screen displayed, select Invoice.
Screen Shot 120: Creditors Invoice Header Screen
Processing a bookings invoice received from a Supplier/Creditor involves a simple process of matching the suppliers invoice against the service or voucher from the booking. This means that Tourplan can record what the booking service value was, what the invoice value is and record any under or over payments.

|
The use of the term Voucher in this section does not mean that a voucher has had to be physically created or printed. It means that the booking has a status that allows service lines to become accountable entities and the service status of the individual line(s) in the booking also allows the service to become accountable. When the term Tagging Vouchers is used, it really means Tagging for payment a booking service whose statuses allow payment to be made. |
Transaction processing follows a Wizard which leads through all of the required stages. This first screen is the Invoice Header Screen and it contains the following fields:
 Transaction Header Section
Transaction Date (Date)
This is the date from which the Transaction Period (as described under Accounting Period Definitions)is determined, and the date that displays in this field is always the current system date. Unlike debtors, there is no INI setting for the default transaction date. The Transaction Period number displays to the right of the date field, and the corresponding Start Date/End Date of the period displays to the right of the period number. The Transaction Date can be overridden. This could affect the transaction period and the aging of the invoice if the month is changed. The Transaction Date must be in an open period — the system will not allow a transaction date which is in a closed accounting period.
Reference (20 Chars)
The transaction reference. The suppliers invoice number or invoice reference.

|
If the supplier does not provide an invoice number or reference, we do not recommend using the booking reference as a transaction reference. This can lead to a degree of confusion when looking in the transaction list for a transaction and the Transaction Item, Transaction Reference and Transaction Apply fields all have the same value in them. |
Currency (Drop-down)
The currency that the creditors invoice will be entered into the system in. This can be changed to any of the currencies that are attached to the supplier. The currency which was checked as the default in the currencies screen during supplier set up (see Screen Shot 94 Supplier Currencies Screen) is the currency which displays by default.
Currency Sub code (Drop-down)
A currency sub code can be selected here.

|
The currency sub code is used by the system to determine which currency exchange rate between a pair of currencies is to be used when generating a supplier’s invoice in the situation where the service currency is different to the invoice currency. |
Payment Due Date (Date)
This date is calculated from the payment terms for this supplier/currency as entered in the supplier currencies screen (see Screen Shot 94 Supplier Currencies Screen). It can be overridden if required.
Invoice Total (Numeric 15, 2)
The total value of the creditors invoice can optionally be entered here. This is used as a control total when the invoice lines are being entered. When the invoice is finished, any discrepancy between the invoice lines total and the value in this field will result in a warning message advising that the totals don’t match. Normal saving of the invoice can continue.
Branch/Department/Account (Drop-downs/Search)
The GL Account that the expense of this invoice will be posted to.
The currency sub code is used by the system to determine which currency exchange rate between a pair of currencies is to be used when generating a supplier’s invoice in the situation where the service currency is different to the invoice currency.

|
When a service is entered into a Booking, the expense account(s) are known based on INI settings, so these fields should be left blank. For a non-bookings invoice, the expense account must be entered at some stage, so can be entered here, or on the Invoice Line Detail Screen. |
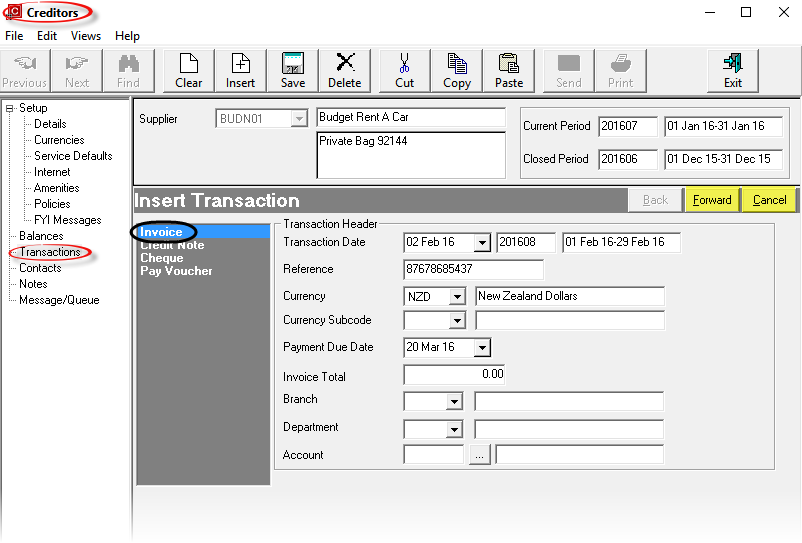
Screen Shot 121: Creditors Invoice Header Screen – Completed Example

|
Click the Forward Button (highlighted yellow) on the Wizard Bar to continue. The Invoice Line Detail window will overlay the Transaction Header Screen. |

|
Click the Cancel Button (highlighted yellow) to cancel the invoice |
Screen Shot 122: Insert Invoice Line Detail
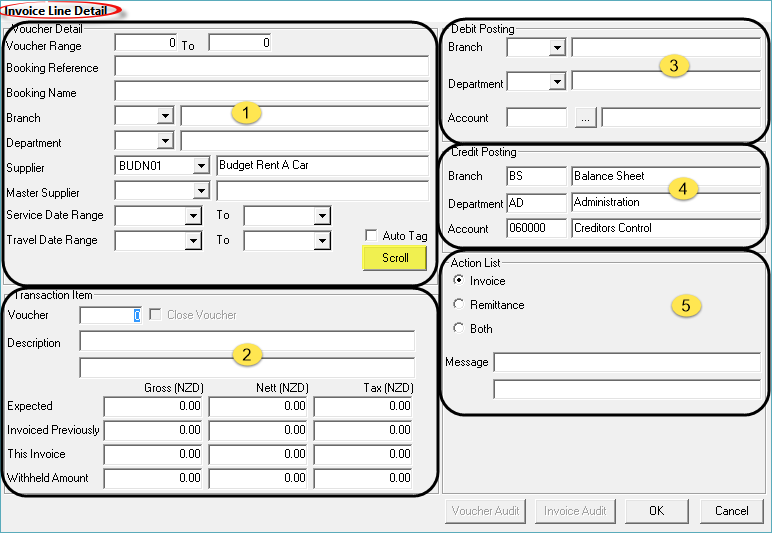
The screen shown in Screen Shot 122 Insert Invoice Line Detail has two purposes:
The Invoice Line Detail Screen is divided into 5 sections:
 Voucher Detail
 Transaction Item
 Debit Posting
 Credit Posting
 Action List
This section allows searching for booking services that may be included for payment on the creditors invoice.

|
Not all fields have to be completed for a search to begin. The Scroll button |

|
Note that for services to be able to be paid, they must have a) a service status that allows vouchering (although vouchers may not necessarily have been issued) and b) the booking status (of the booking the service belongs to) must be one that allows vouchers to be issued. This means that although services may exist for the supplier that match the criteria entered in this section of the screen, the services will not display for payment unless the service and booking status criteria are met. |
Screen Shot 123: Service Search Criteria
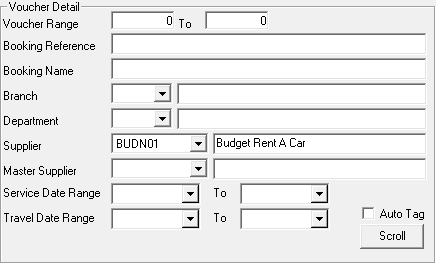
Services to be paid can be searched for using the following fields:
Voucher Range From/To (Integer 8)
If the voucher number is known, enter it as both the From number and To number. If the approximate numbering range is known, enter the range From/To.
Booking Reference (10 Chars)
If only the booking reference is known, enter it here. Capitalisation is not important nzfi101502 will find NZFI101502.
Booking Name (60 Chars)
Enter the first several characters of the name on the booking to search with this field. I.e., if the Booking Name is Hardy/Laurel Party, entering Hardy in this field and clicking Scroll will locate the service. Entering Laurel and clicking Scroll will not find the service, since the booking name does not start with Laurel.
Branch/Department (Drop-downs)
These two drop-downs relate to the Booking Reference Branch and Department, so the search can be for services for specific booking Branch and/or booking Department combinations.
Supplier (Drop-down)
This field defaults to the supplier selected when the invoice header was started. If the supplier is changed here, the presumption is that the costs of a voucher that was issued to this supplier for a service are going to be paid to another supplier. An example of this is explained under Paying an Alternate Supplier.
Master Supplier (Drop-down)
This drop-down can be used to locate services for the subsidiary suppliers of a Master Supplier. This can then be used to pay the master supplier amounts owed to subsidiary suppliers. Examples of this process are explained under Pay Master Supplier .
Service Date Range From/To (Date)
Services can be searched for based on their service date using these two fields.
Travel Date Range From/To (Date)
Services can be searched for based on the booking travel date using these two fields.
When this box is checked, the services which display will be automatically tagged for processing. They can be untagged individually if required.
Scroll (Button)
When selections have been completed, click this button to commence the search. The Tag Vouchers screen (Screen Shot 128 Tag Vouchers Screen) will display when the search is complete.

|
If large quantities of services are located, a message will display advising that a large number of services have been found and the scroll can be cancelled to add filters. |
Screen Shot 124: Transaction Detail
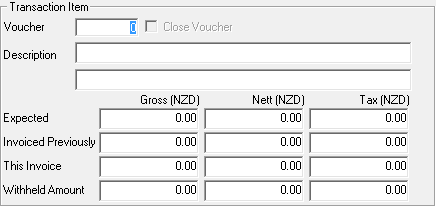
When a single service is tagged and selected from the Tag Vouchers Screen and OK is clicked in that screen, the values from the selected service will populate these fields. Edits can be made if needed.

|
If the Scroll button is clicked and multiple services are tagged and selected in the Tag Vouchers screen and OK is clicked in that screen, this complete screen is by-passed and the New Invoice Screen (Screen Shot 135 Creditors New Invoice Screen) displays with all lines that have been selected and tagged. These can be individually selected and edited. |

|
When a non-booking invoice is being entered, these fields are used to enter the transaction detail. |
Voucher (Integer, 8)
For bookings transactions, the voucher number of the selected transaction will display.

|
If a single line is being paid and the voucher number is known, all sections of this screen can be left blank and the voucher number entered here. Provided the voucher number is found, the entire screen will populate with the service detail. |

|
For non-bookings transactions, leave this field blank. |
Close Voucher (Checkbox)
This checkbox becomes active once a valid voucher number is found. When checked, the voucher will be Closed when the invoice is saved.

|
The default value of either checked or unchecked can be set with the Accounts Payable INI setting AP_DEFAULT_CLOSE_VCH. |

|
When a service has been paid and closed, it is not able to be changed or deleted within the booking. The individual FastBook and GroupBook INI settings EDITCLOSEDVOUCHER are able to be set on a user by user basis to allow some editing after closing. If further payments are made against a service that has been closed, a warning message will advise that the voucher has already been closed, but further payments can be made. |
Description (2 Fields, 60 Chars Each)
For bookings transactions, the first description line is used for the booking name.
For non-booking transactions, these two fields are where the user entered description of the transaction is entered.
Expected (Display Only, Bookings Transactions Only)
These three fields (Gross, Nett, Tax) display the service line value—i.e., the amount expected to pay.
Invoiced Previously (Display Only, Bookings Transactions Only)
These fields display any amount which has been previously paid against the service.
This Invoice (Numeric, 11.2)
For bookings transactions, these fields will be automatically filled with the outstanding value of the service. If there have been no previous payments for the service, the expected values are used. They can be overridden.

|
If the amount to pay has been edited in Screen Shot 128 Tag Vouchers Screen then the edited amount is used here when the Tag Vouchers Screen is exited. |

|
Any tax values for bookings transactions are calculated from the service line tax, not from the tax type which may be attached to the creditor. |
For non-bookings transactions, the amount being paid is entered in the Gross field. If a tax type is attached to the creditor, it is used to calculate the tax component. The values can be overridden.
Withheld Amount (Numeric, 11.2)
If an amount is being withheld from the supplier—i.e., an amount in dispute that may be paid at a later date — then the amount being withheld can be entered in these fields. Withheld amounts can be released for payment or crediting. See Accounts Training Guide 2 .

|
When an amount is being withheld, the full amount (including the amount to be withheld) is entered in the This Invoice fields, and the withheld amount in the Withheld fields i.e., This Invoice 100.00, Withheld 20.00. |

|
Withheld amounts should not be confused with short payments. If the expected/vouchered value is 100.00 and the supplier sends an invoice for 80.00, then the 20.00 residual is not a withheld amount, it is an under payment and the voucher can be closed. If the expected/vouchered value is 100.00 and there is a dispute over 20.00 of the invoice, then the 20.00 is a withheld amount. |
Screen Shot 125: Debit Posting Detail
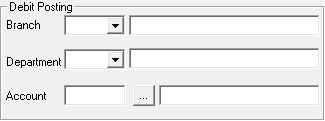
This section of the Invoice Line Detail Screen shows the General Ledger debit posting account. For a Creditors Invoice, the debit account will be the expense account associated with the transaction.
Debit Posting – Branch/Department/Account (Drop-downs/Search)
Unless an expense account was selected when the invoice header was created (see Screen Shot 121 Creditors Invoice Header Screen – Completed Example), the debit posting fields will be blank when this screen is first displayed.

|
For bookings transactions, these fields must be left blank, since the system INI settings will determine which G.L. Accounts are to be used for bookings invoices. |

|
For non-bookings transactions, if a G.L. Expense Account was entered in the Invoice Header Screen (see Screen Shot 121 Creditors Invoice Header Screen – Completed Example), it can be changed here. |
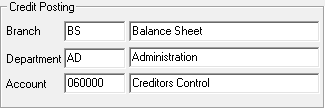
Screen Shot 126: Credit Posting Detail

|
The Credit Posting Account for a creditors invoice is, by default, the Creditors Control account. This is obtained from INI settings and cannot be changed here. |
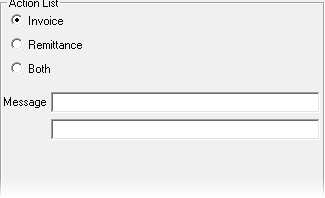
This section allows two lines of text to be entered which can be later output on messages. This text is usually used to describe reasons for payment amounts being different to invoice amounts.
Invoice (radio button)

|
This radio button is now redundant. All output is controlled by the Remittance and Both buttons. |
Remittance (radio button)
When checked, the text will be output on remittance advice type messages.
Both (radio button)
When checked, the text will output on both remittance advice type messages and standard supplier messages.
Message (2 fields, 60 Chars each)
Any message (if required) can be entered in these fields.

|
If a different message is required to the different output types (e.g., one message for the remittance advice, and a different message for the standard supplier message, then the message formats can be designed so that one format (e.g., Remittance) outputs message line 1 and the standard supplier message outputs line 2. |

|
When the required selections have been made in the Screen Shot 123 Service Search Criteria screen, click the Scroll button in the centre of the Invoice Line Detail Screen. The scroll as in Screen Shot 128 Tag Vouchers Screen will display |

|
Click the Cancel Button to cancel the invoice |
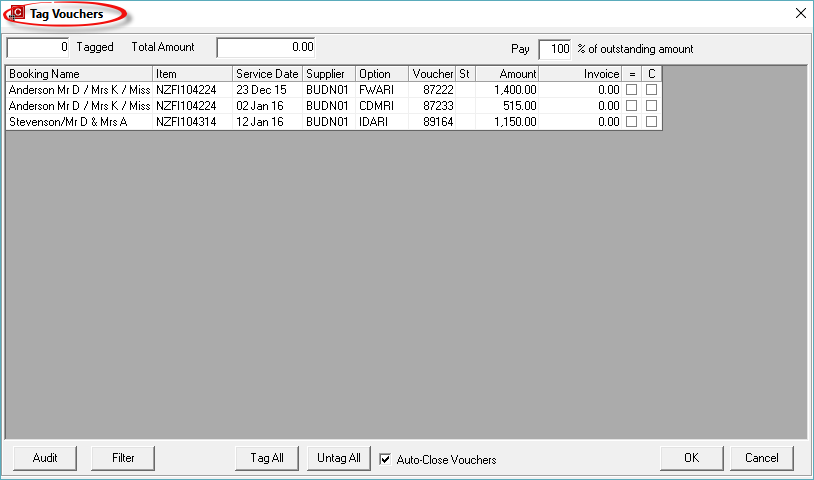
Screen Shot 128: Tag Vouchers Screen

|
The column headings at the top of this scroll are the only headings available for this screen. |
This screen enables booking services to be tagged and then processed as a payables invoice to the supplier.
The columns in this screen are:
Booking Name (Display Only)
The booking name.
Item (Display Only)
The booking reference.
Service Date (Display Only)
The date the service took place.
Supplier (Display Only)
The code of the supplier being paid.

|
This will generally be the same supplier code as selected from the supplier drop-down as in . If services for an alternate supplier have been selected, then the alternate supplier code will display here. See example under Paying an Alternate Supplier |
Option (Display Only)
The option/product code of the service being paid.
Voucher (Display Only)
The voucher number of the service being paid.
St (Status) (Display Only)
The voucher status. This indicates the current status of the voucher and can be one of the following:
|
|
Vouchers have not been printed, but the service meets the criteria to be paid. |
|
P |
The voucher has been printed |
|
R |
Subsequent to the voucher being printed, an amendment has been made to the service in the booking and a (R)eprint of the voucher has not yet been done. |
|
L |
The service has been flagged in the product database as a (L)iability only. |
Amount (Display Only)
The value outstanding on the voucher. For vouchers that have been part paid, and not closed, this value is the balance outstanding.
Invoice (Numeric, 11.2)
The amount invoiced from the supplier. If the amount of the supplier's invoice is different to the outstanding amount to the left of this column and is going to be paid, the supplier's invoice amount can be entered here.
= (Checkbox)
If the amount of the suppliers invoice is equal to the outstanding amount, checking this box will fill in the outstanding amount in the Invoice column, and set a checkmark in the adjacent checkbox in the ‘C’ column, provided the Auto Close Vouchers checkbox is checked.
C (Checkbox)
Checking this box indicates that the voucher is to be closed when the invoice is saved.

|
If the Auto Tag (Checkbox) has been checked in the Invoice Line Detail Screen, then when Scroll is clicked in that screen, all lines in the Tag Vouchers Screen will have the outstanding amount displayed in the Invoice field and the = and C checkboxes will be checked. These can all be changed. |
Screen Shot 129: Unpaid/Short paid Booking Warnings
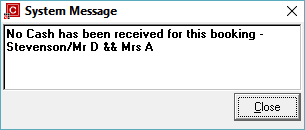
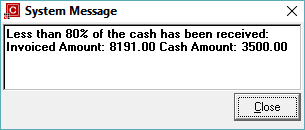
When services have an amount entered in the Invoice column (either by checking the =; setting the Auto Tag on in the Invoice Line Detail Screen or manually entering the amount), the system checks to see if payment has been received for the booking. One of the warnings in Screen Shot 129 Unpaid/Short paid Booking Warnings will display if:
Whether the warning message displays and when it displays can be controlled by the AP INI Setting AP_VOUCHER_ERRORS. The available settings are:
|
T |
The warning message will display when the = checkbox is checked or when an amount is entered into the Invoice column. |
|
O |
The warning message will display when the OK button is clicked in the Tag Vouchers screen after selections have been made. |
|
A |
The warning message will display when the Tag All button (Screen Shot 131 Tag Vouchers – Bottom of Screen) is clicked. |
|
N |
The warning message will never display. |
Screen Shot 130: Tag Vouchers – Top of Screen

The top of the Tag Vouchers Screen has 3 fields:
Tagged (Display Only)
Displays the number of vouchers in the list that have been tagged for processing.
Total Amount (Display Only)
The sum total of the Invoice column values of the vouchers in the list that have been tagged for processing.
Pay [ ] % of Outstanding Amount
This feature allows a percentage of the outstanding amount to be paid when the = checkbox is checked. The calculated amount which then displays in the Invoice column can be edited.

|
This feature does not work if the Auto Tag checkbox has been checked in the Invoice Line Detail Screen. |
Screen Shot 131: Tag Vouchers – Bottom of Screen

The bottom of the Tag Vouchers screen has 5 buttons and one checkbox.
Audit (Button)
This is covered under Audit Voucher, below.
Filter (Button)
Clicking this button will re-display the Screen Shot 123 Service Search Criteria. An additional checkbox is included which, when checked, will retain any lines that fail the new search criteria, but which have been already tagged.
Tag All (Button)
Clicking this button will tag all lines in the Tag Vouchers Screen.
Untag All (Button)
Clicking this button will untag all lines in the Tag Vouchers Screen.
Auto Close Vouchers (Checkbox)
When unchecked, the ‘C’ column checkbox in the Tag Vouchers screen will not be checked automatically when the = checkbox is checked, or Tag All is clicked.
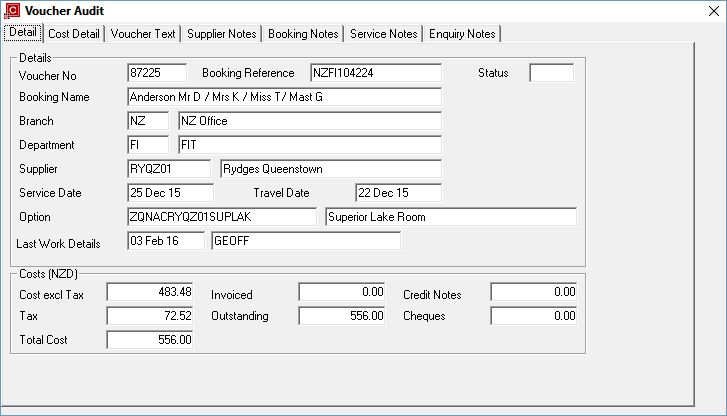
Clicking on any field in a displayed row in the Tag Vouchers Screen (except the = or C checkboxes) and then clicking the Audit button will display a screen with several tabs that contain the voucher detail. All fields under the tabs are display only. Only the Detail and Cost Detail tabs are reproduced here. Field explanations are only given for the Cost Detail tab — all others are self-explanatory.

|
The example in Screen Shot 132 Voucher Audit – Detail Tab is for an accommodation service, not the rental car booking being processed for payment. Greater detail is displayed in the cost detail tab for accommodation services than for non accommodation services. |
Screen Shot 132: Voucher Audit – Detail Tab
Screen Shot 133: Voucher Audit – Cost Detail Tab


|
The column headings at the top of this scroll are the only headings for this screen. |

|
There is a subtle difference in the way accommodation services for Fastbook and GroupBook are presented in this screen. For Fastbook services, there is a row for each Room in the booking that has used the service—e.g., if there were two double rooms using the service, then Double would show twice. In GroupBook, there is one row per room type. |
The column headings in this screen are:
|
Heading |
Displays |
|
Pax |
The number of pax per room based on the room type |
|
AA |
The number of additional adult pax per room based on the room type. |
|
CH |
The number of Child (Supplements) per room based on the room type. |
|
CS |
The number of Child (Share) per room based on the room type. |
|
IN |
The number of infants per room based on the room type. |
|
ES |
The number of escorts per room. |
|
DR |
The number of drivers per room. |
|
GD |
The number of guides per room. |
|
FCU Cost |
A slight misnomer. This field is the quantity of First Charge Units, (e.g., Rooms) net of any additional FOC’s that may have been given to the Agent. |
|
SCU Qty |
The number of second charge units—e.g. Nights. |
|
(Currency) Cost |
The cost (per room) of the service, including tax. |
|
(Currency) Tax |
The tax component of the cost. |
Screen Shot 134: Tag Vouchers Screen

The example in Screen Shot 134 Tag Vouchers Screen has had two voucher lines tagged. This example will show the New Invoice screen that displays after OK is clicked.
A second example invoice will be created paying only the third voucher which will show the populated Invoice Line Detail screen before the New Invoice screen displays.

|
As many services as are on the suppliers invoice can be selected in this screen and either the vouchered value (Amount) or specific amounts (Invoice) can be entered. |

|
To continue, click the OK button at the bottom of the tag vouchers screen. |

|
Click the Cancel button at the bottom of the tag vouchers screen to cancel the invoice |
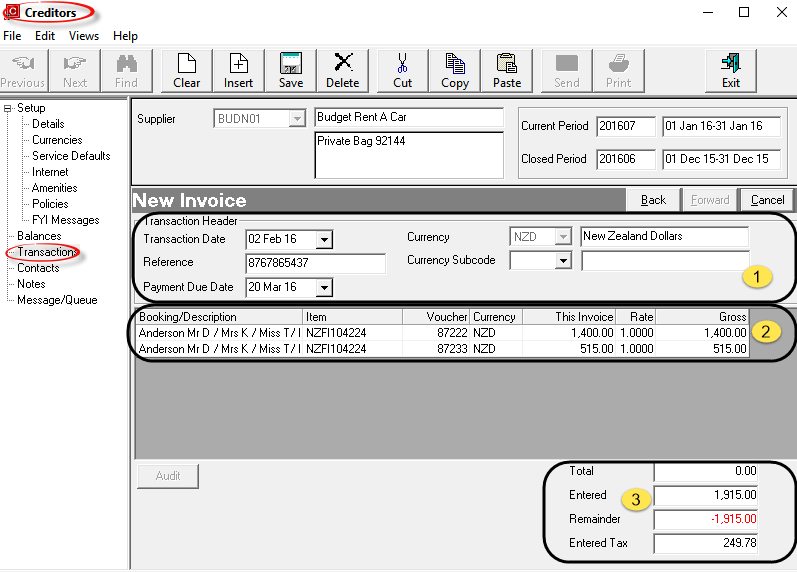
Screen Shot 135: Creditors New Invoice Screen

|
The column headings at the top of the scroll are the only column headings available in this screen |

|
Because multiple vouchers had been tagged in Screen Shot 134 Tag Vouchers Screen, this screen that displays when OK is clicked on that screen. Each of the vouchers which had been tagged shows as an individual line in the invoice. |
This screen is in three sections
 Transaction Header
 Transaction Lines
 Transaction Total
 Transaction Header Section
Transaction Date (Date)
This is the transaction date that was entered in Screen Shot 121 Creditors Invoice Header Screen – Completed Example. It can be edited here.
Currency (Display Only)
The currency of the transaction as selected in the Invoice Header Screen Shot 121 Creditors Invoice Header Screen – Completed Example.
Reference (Display Only)
The transaction reference (Suppliers Invoice reference) as entered in the Invoice Header screen.
Currency Sub code (Drop-down)
The currency sub code as entered in the Invoice Header screen. This can be changed here if necessary.
Payment Due Date (Date)
The payment due date as defaulted or edited in the Invoice Header screen. It can be edited here.
 Transaction Lines Section

|
The transaction lines are display only in this screen. To edit the line detail, double click the line. This will open the Invoice Line Detail screen (Screen Shot 138 Completed Invoice Line Detail Screen). |
Booking/Description
Description line 1 from the Invoice Line Detail screen (Screen Shot 138 Completed Invoice Line Detail Screen).
Item
This is either a) in the case of Booking Transactions, the Booking reference, or b) for non-bookings transactions, the transaction reference (invoice) number.
Voucher
The voucher number from the Invoice Line Detail screen as above.
Currency
The currency that the voucher was issued in.
This Invoice
The value of this line in the invoice in voucher currency.
Rate
The exchange rate used to convert the invoice value from voucher currency to invoice currency.

|
The exchange rate which displays here will be either the rate from the Tourplan currency table as at the transaction date, or the exchange rate that was used when the service was inserted into the booking to convert the service option currency to the system base currency. Which rate used is determined by the AP INI setting AP_EXCHANGE_RATES. |
Gross
The gross value of the transaction line from the Invoice Line Detail screen.
 Transaction Total Section
All fields in this section are display only.
Total
The amount that was entered in the Invoice Total field in the invoice header (as in Screen Shot 121 Creditors Invoice Header Screen – Completed Example
) as the invoice control total.
Entered
The total value of all invoice lines so far entered.
Remainder
The calculated value of Total less Entered
Entered Tax
The total of tax on all invoice lines so far entered.

|
To edit an existing transaction line, double click the line. |
If additional lines need to be added to the invoice, click the Insert button  in the button bar. The Invoice Line Detail screen (Screen Shot 122 Insert Invoice Line Detail) will re-display.

|
To return to the Invoice Header screen, click the Back button on the Wizard bar. |

|
To cancel the transaction completely, click the Cancel button on the Wizard bar. |

|
To save the invoice, click the Save button in the button bar. |
Screen Shot 136: Allocated Amount Incorrect Warning

On save, if the amount in the Remainder field in the Transaction Total section is not 0.00, the above warning message displays.
To ignore the warning and continue the save, click the Yes button. To go back to the New Invoice screen, click the No button. Another warning message advising that the invoice has not been saved will display.
Screen Shot 137: Tag Single Voucher

In Screen Shot 137 Tag Single Voucher, voucher 89164 has been invoiced for slightly less than the voucher value, so this amount has been entered in the Invoice field. On the assumption that another invoice is not going to be received from the supplier, the Close checkbox has been ticked.

|
To continue, click the OK button at the bottom of the tag vouchers screen. The Completed Invoice Line Detail screen will display |

|
Click the Cancel button at the bottom of the tag vouchers screen to cancel the invoice |
Screen Shot 138: Completed Invoice Line Detail Screen
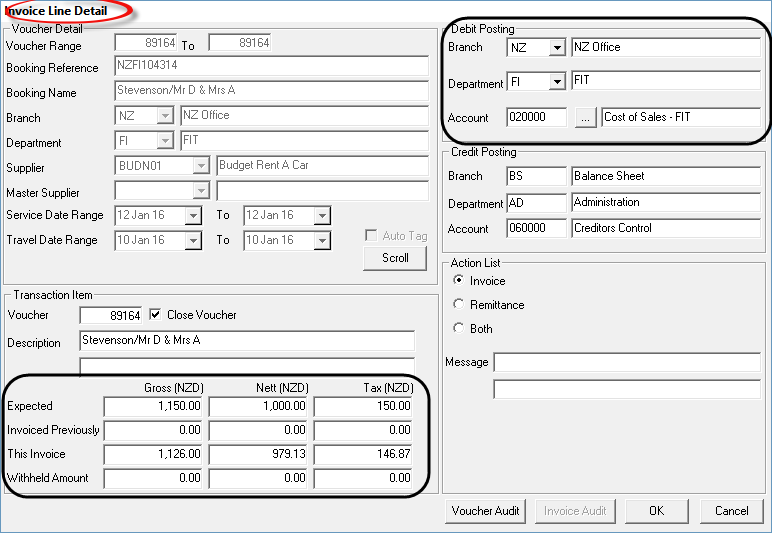
Since only one voucher was tagged in the Tag Vouchers scroll, the Invoice Line Detail Screen is re-displayed, and has been populated with booking and accounting data.

|
If multiple vouchers have been selected, the New Invoice screen (Screen Shot 135 Creditors New Invoice Screen) will display when OK is clicked in the Tag Vouchers screen, listing all vouchers that had been selected. |
The Voucher Detail quadrant of the screen (top left) is display only, so is dimmed out.
Posting Details Section (Top Right)
The Debit posting account detail has been automatically completed, based on system INI settings. The Credit Posting details cannot be changed.

|
The debit postings should not need to be changed. Changing them can lead to accounting errors. |
Transaction Item (Bottom Left)
This section displays the transaction detail. Some fields in this area can be edited if required.
Voucher Number
The voucher number cannot be changed.

|
If the incorrect record has been selected, click the Cancel button which will exit this screen and display the New Invoice screen (Screen Shot 135 Creditors New Invoice Screen). Click the Insert button in the button bar and the Invoice Line Detail screen (Screen Shot 122 Insert Invoice Line Detail) will be re-displayed. |
Close Voucher (Checkbox)
This has inherited the setting from the Close checkbox in the tag vouchers screen. If the voucher is not to be closed, uncheck the box.
Description (2 Fields, 60 Chars each)
The booking name is automatically written to the first description field. This can be edited and additional text can be entered in the second field if required.
Expected (Gross, Nett, Tax) (Display Only
These three fields display the vouchered amount that was expected to be paid.
Invoiced Previously (Gross, Nett, Tax) (Display Only
These fields display any amount for this voucher which has been previously invoiced.
This Invoice (Gross, Nett, Tax) (Numeric, 11.2)
These fields show the amount that was entered or selected in the tag vouchers screen. They can be overwritten.
Withheld Amount (Gross, Nett, Tax) (Numeric, 11.2)
Any amount required to be withheld. See the description for Withheld Amount.

|
When an amount is being withheld, the full amount (including the amount to be withheld) must be entered in the This Invoice fields, and the withheld amount entered in the Withheld fields. |

|
To continue, click the OK button. The New Invoice screen will display. This is the same screen as in Screen Shot 135 Creditors New Invoice Screen and from this point, the processing of the invoice is the same as tagging multiple vouchers. |

|
Click the Cancel button to cancel the invoice |
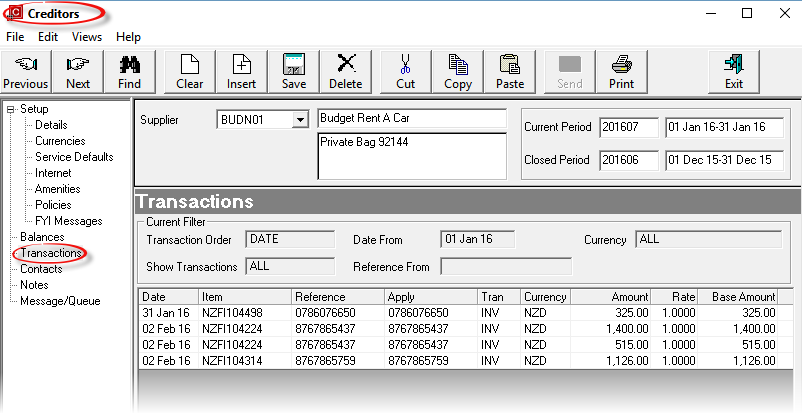
Screen Shot 139: Creditor Transactions Screen

|
The column headings at the top of the scroll are the only column headings available in this screen. Not all columns are visible—use the scroll bar at the bottom of the screen to view the last column Age. |

|
This is the same screen seen in Screen Shot 117 Creditors Transaction Display Screen and is where the insert of the Invoice transaction started. |
|
Heading |
Displays |
|
Date |
The transaction date from the transaction header. |
|
Item |
This is either a) in the case of Booking Transactions, the booking reference, or b) for non-bookings transactions, the transaction reference (invoice) number. |
|
Reference |
The transaction reference as entered on the Transaction Header—e.g. the Suppliers Invoice number. |
|
Apply |
This is the transaction number against which this transaction has been applied. For Invoice Transactions, Apply is always the same as Reference. For Credit Notes and Cheques, Reference is the Credit Note or Cheque Number and Apply is the Invoice Number that the Credit Note or Cheque applies to. |
|
Tran |
The types of transaction are:
System generated transaction types relating to Foreign Currency variations will display after Forex processing has been run. |
|
Currency |
The currency of this transaction. |
|
Amount |
The amount of the transaction in the currency of the previous column. |
|
Rate |
The exchange rate used in the transaction to the system base currency. |
|
Base Amount |
The amount of the transaction in system base currency. |
|
Age |
The creditors accounting period into which this transaction will age. |

|
To change details of a transaction double click on the Transaction Line. This can only be done provided the transaction is in an open accounting period. |