Open topic with navigation
(continued from Debtors Transactions)
Debtors Credit Note
Debtor Credit Notes (also known as "Credits") can be applied against bookings or non-booking invoices from here. Credit Notes can also be applied from the Booking applications to invoices for the selected booking.

|
Tourplan accounting is open item. Therefore Credit Notes must be applied against an existing invoice or part thereof.
|

|
A Credit Note can be applied against a debtors invoice or against an individual line in a debtors invoice. This allows, for example, a credit to be applied against an actual service in the booking for whatever reason (poor service, weather cancellation etc.). This means that internally, the system records that the monetary value of services provided by that supplier is reduced. If a credit is applied to a complete invoice, the credit amount is applied proportionately (by percentage) across all suppliers lines. This can distort actual analysis values for all suppliers in the booking.
|
To insert a Debtors Credit Note, first select the Debtor the Credit is for, and then select Transactions in the side bar. Click on the Insert button  in the button bar. From the Insert Transaction screen displayed, select Credit Note.
Credit Note Header
Screen Shot 38: Debtors Credit Note Header
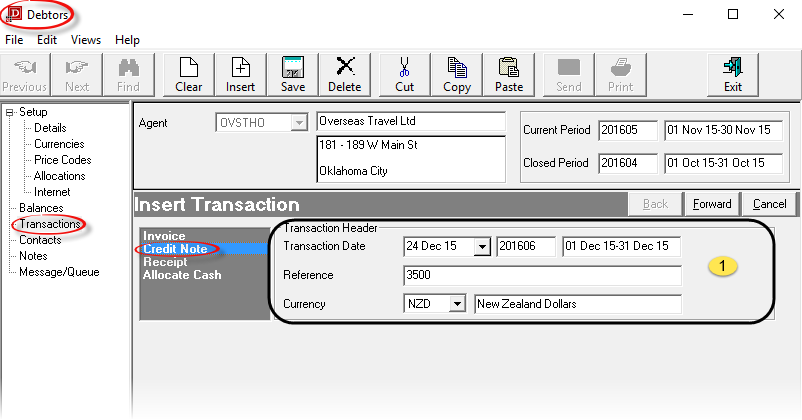
Transaction processing follows a wizard which leads through all of the required stages. The first screen as shown in Screen Shot 38 Debtors Credit Note Header is the Credit Note Header and it contains the following fields:
 Credit Note Header Section
Transaction Date (Date)
Credit Notes always default to current system date. The transaction period number which the transaction date is in displays to the right of the Date field, and the corresponding Start Date/End Date of the period display to the right of the period number. The Transaction Date can be overridden. Credit Notes always inherit the age period of the invoice to which they are applied. The Transaction Date must be in an open accounting period—the system will not allow a transaction date which is in a closed accounting period.
Reference (20 Chars)
The Credit Note Number. This is sequentially allocated from the System INI setting AR_NEXT_CREDIT. This field cannot be overridden unless the Debtors INI setting AR_MANUAL_CREDIT is set to Y.

|
It is not recommended that the Reference field be accessed and reference numbers manually changed. The system will not allow the same reference number to be used more than once for the same transaction type for the same Agent. If manual referencing is permitted, the danger of this occurring increases.
|
Currency (Drop-down)
The currency that the credit will be issued in. This can be changed to any of the currencies that are attached to the agent. The currency which was checked as the default in the currencies screen during agent set up (see Default Currency ) is the one which displays by default.

|
A Credit Note cannot be issued in a currency which is different to the currency of the invoice the credit applies to. When selecting the invoice to apply the credit to, (see Screen Shot 40 Search By Invoice Reference Results) only invoices with same currency as entered in this header screen will be available for selection.
|

|
Click the Forward Button on the Wizard Bar to continue. The Credit Note Line Entry window will overlay the Transaction Header Screen.
|

|
Click the Cancel Button to cancel the Credit Note |
Credit Note Lines
Credit Note Lines Section
Screen Shot 39: Debtors Credit Line Dialogue
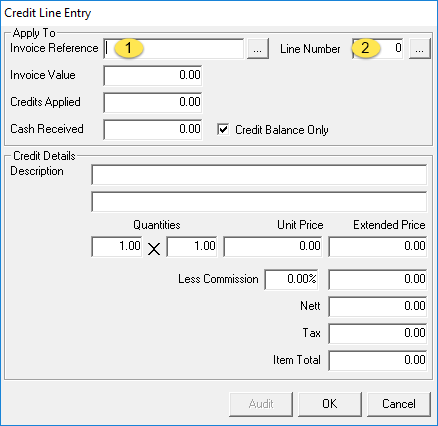
Credits can be applied against the invoice total or against a specific line of the invoice. This is controlled by the two Apply To fields at the top of the screen - Invoice Reference ( ) and Line Number (
 ).
).
 Invoice Reference (20 Chars, Search Button)
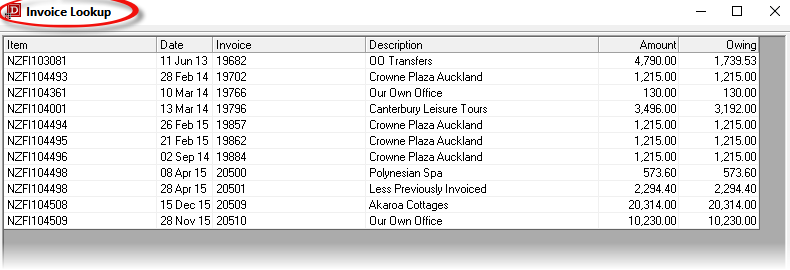
If the reference of the invoice being credited is known, it can be entered in this field. If the reference is unknown, clicking the Search button (  ) will list invoices (in the Credit Note Header currency) that are available for credit.
Screen Shot 40: Search By Invoice Reference Results
 Line Number (Integer, Search Button)
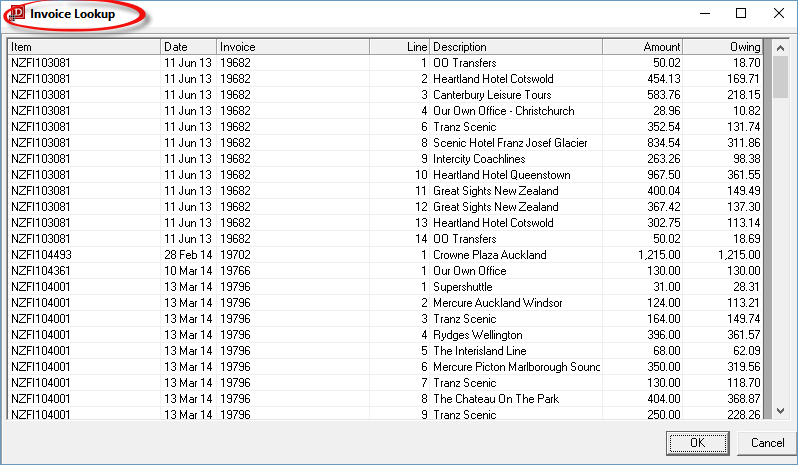
If a specific line number of an invoice is to be credited, clicking the Search button ( ) next to Line Number field will display the individual lines of all invoices available for credit.
Screen Shot 41: Search By Invoice Line Results
Screen Shot 42: Debtors Credit Line Entry – Invoice Reference Selected
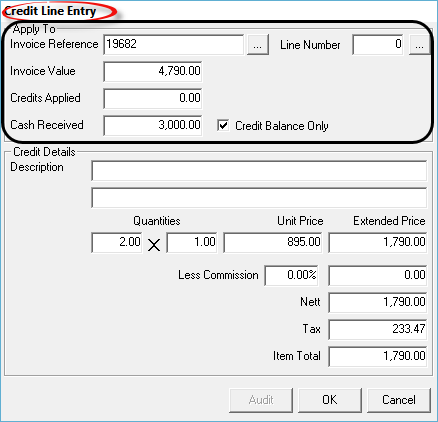
The Fields in the 'Apply To' section of Screen Shot 42 Debtors Credit Line Entry – Invoice Reference Selected are display only
When an Invoice is selected for credit (as opposed to a specific line in an invoice), by default the system will calculate the credit value to be the outstanding balance of the invoice. The example in Screen Shot 42 Debtors Credit Line Entry – Invoice Reference Selected shows a Credit value of 1790.00 which is the Invoice Value of 4790.00 less the Cash Received value of 3000.00 = 1790.00. The quantities fields are based on the first and second charge quantities found in the last line of the invoice being credited. All values in the bottom half of this dialogue (beneath Credit Details) can be edited, including the two Description fields.
Screen Shot 43: Debtors Credit Line Entry - Line Number Selected
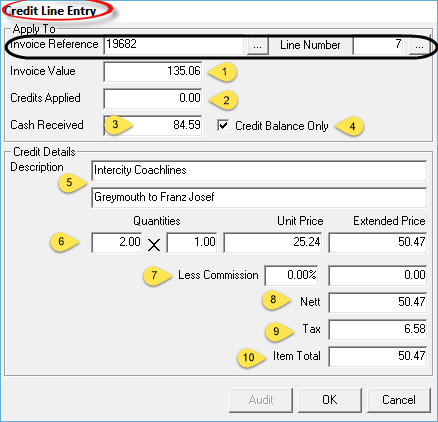
When an invoice line is selected for credit, by default the system will calculate the credit value to be the outstanding balance of the line. The example in Screen Shot 43 Debtors Credit Line Entry - Line Number Selected shows a credit value of 50.47 which is the Invoice Value ( ) for the line of 135.06 less the Cash Received (
 ) value of 84.59 = 50.47.
The quantities fields are based on the first and second charge quantities in the line of the invoice being credited. All values in the bottom half of this dialogue (beneath Credit Details) can be edited.
The fields in this dialogue are:
Apply To Section
 Invoice Value (Display Only)
This will display the value of either the invoice selected or the invoice line selected.
 Credits Applied (Display Only)
This field displays the value of any credits which may have already been applied against the item selected for credit.
 Cash Received (Display Only)
The value of any cash received against the item selected for credit.
 Credit Balance Flag (Checkbox)
This checkbox determines what will initially display in the Nett value field. When unchecked, it displays the total value of the invoice or invoice line that has been selected for credit. When checked, it displays any outstanding value only.

|
If the Item Total field ( ) is 0.00, then the Credit Balance Flag is disabled. ) is 0.00, then the Credit Balance Flag is disabled.
|
Credit Details Section
 Description
Two lines are available for text detail of the item. When a selection has been made by Line Number, the original description text is defaulted to these lines. Whether both or either of these physically appear on a printed credit note document will depend on how the credit note message format(s) have been defined.
 Quantities
If required, multiple quantities can be entered, e.g. 2 x 1. These quantities provide the calculation to obtain the extended price. Again, whether both or either of these physically appears on a printed credit note document will depend on how the credit note message format(s) have been defined.
 Commission
If the credit note has a commission factor, it can be entered either as a percentage amount in the 0.00% field, or the actual amount of commission can be entered. This will be expressed as a percentage in the 0.00% field.
 Nett Value
This will default to the nett value of the invoice or invoice line being credited—the presumption being that the full value is being credited. This value can be overridden.
 Tax Amount
This will default to the tax amount of the invoice or invoice line being credited—the presumption being that the full value is being credited. This value can be overridden.
 Credit Total
This will default to the total value of the invoice or invoice line being credited—the presumption being that the full value is being credited. This value can be overridden.

|
Click the OK Button to save the Credit Note line.
|

|
Click the Cancel Button to cancel the Credit Note line. |
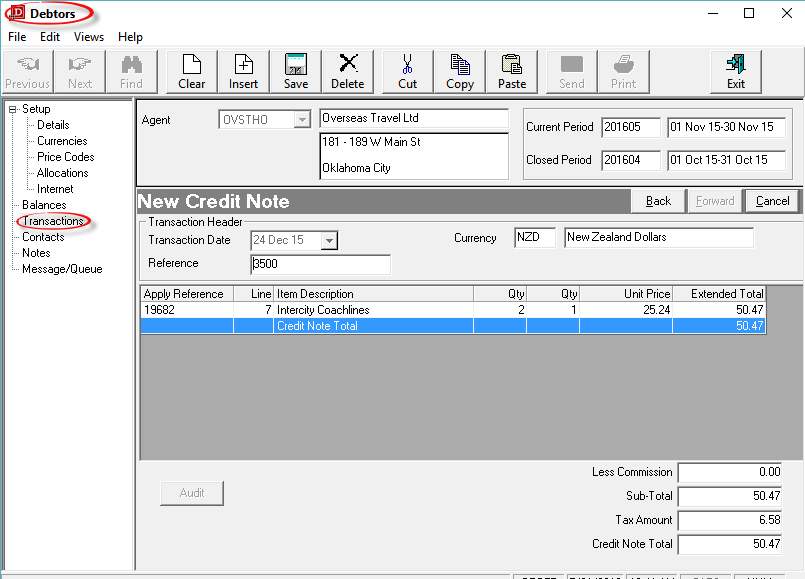
Screen Shot 44: Completed New Credit Note

|
The column headings at the top of the scroll are the only column headings available in this screen.
|

|
If there are no additional lines to add to the Credit Note, click the Save button on the Button bar. When saved the Output Transaction dialogue (Screen Shot 47 Output Debtors Transaction Dialogue) will display.
|

|
If additional lines are to be added, click the Inset button on the button bar. The Invoice Line Detail dialogue as in Screen Shot 39 Debtors Credit Line Dialogue will re-display. |
Screen Shot 45: Debtors Credit Line Entry – Amended Credit Amount
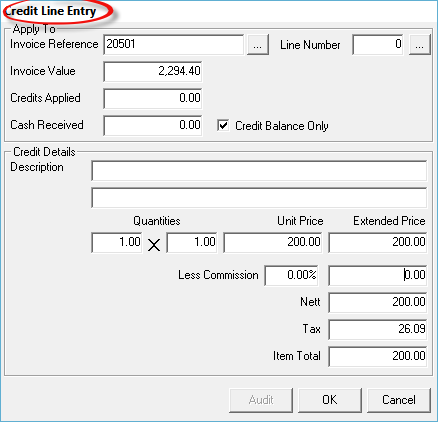
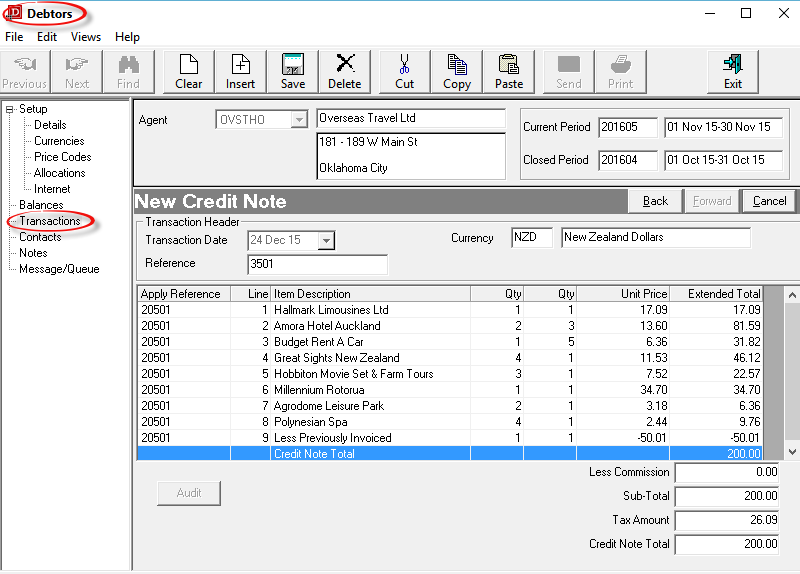
Screen Shot 45 Debtors Credit Line Entry – Amended Credit Amount is the same dialogue as in Screen Shot 42 Debtors Credit Line Entry – Invoice Reference Selected, except the total of the credit value has been edited. In this case, the credit value of 200.00 will be applied proportionately across all invoice lines.
Screen Shot 46: Credit Applied Across All Invoice Lines

|
To continue, click the Save button in the Button bar. The output transaction selection dialogue as in Screen Shot 47 Output Debtors Transaction Dialogue will display.
|

|
If any item on previous screens need correcting, use the Back button on them New Credit Note bar. |

|
To cancel, click the Cancel button on the New Credit Note bar
|
Credit Note Output
Screen Shot 47: Output Debtors Transaction Dialogue
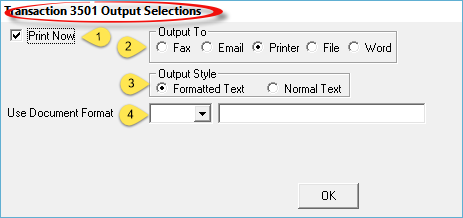
This dialogue box allows the Credit Note to be output on a document.

|
Valid Credit Note document template(s) must be set up (System > Messaging) before the Credit Note can be output. The Tourplan System Setup Training Guide has detail regarding templates.
|

|
The design of the Credit Note document template will determine what the document will look like in printed/emailed/faxed/saved format. The layout in Screen Shot 48 Document Edit Screen are not representative of any format layout.
|
 Print Now (Checkbox)
If the document is to be output, leave this box checked. If a document is not to be output, uncheck the box.
 Output To (Radio Button)
Output options are Fax (requires Tourplan compatible faxing software), Email, Printer, disk File or MS Word.

|
Document templates must have the correct codes in them to enable the document to be emailed or faxed. Email output requires the email INI settings to be set and MS Word output requires the special MS Word template file to be available. Details of these settings are in the System Setup Training Guide.
|
 Output Style (radio button)
The default is Formatted Text. This means that the invoice document will be output in RTF (Rich Text Format) which includes graphics (if embedded in the document).Normal Text is designed to be used with Dot Matrix style printers which do not offer graphics support.
 Use Document Format (Drop-down)
Select the required document format from the available list.

|
For audit and security reasons, System settings may prevent editing of the document.
|

|
To continue, click the ok button at the bottom right of the dialogue. The Document Edit window will display. |
Screen Shot 48: Document Edit Screen
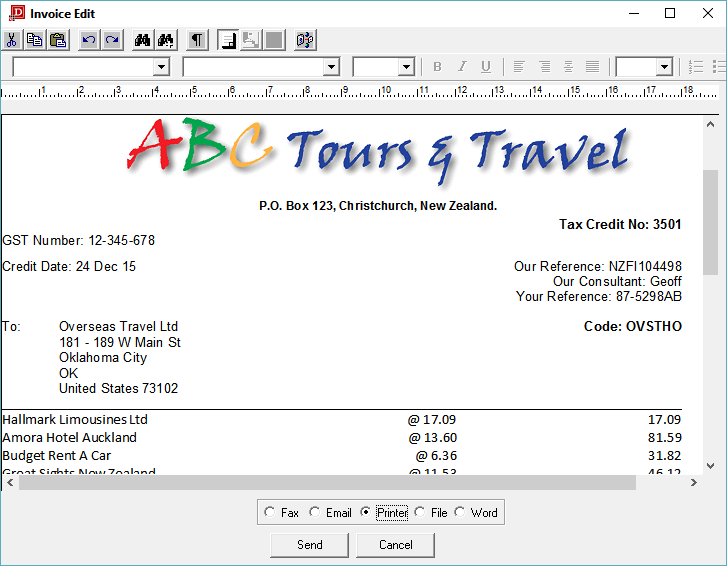
The output options (fax, email, printer, disk file or MS Word) re-display at the bottom of the screen and can be changed if necessary..

|
To send the invoice document, select the output method and click the Send button. |

|
To cancel, click the Cancel button.
|
On completion (either Send or Cancel), the Transaction List screen is displayed.
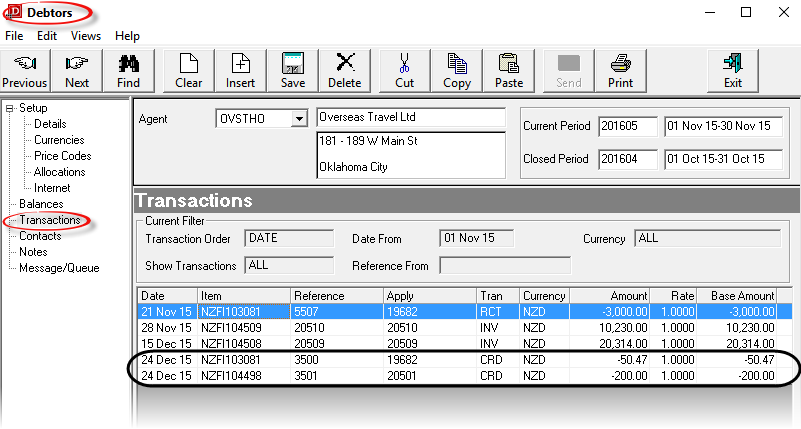
Screen Shot 49: Transaction List Screen

|
The column headings at the top of the scroll are the only column headings available in this screen. Not all columns are visible—use the scroll bar at the bottom of the screen to view the last column Age.
|
The two Credit Notes created as examples in this section are highlighted. Note the Apply field for these two transactions displays the Invoice Numbers which have had the credit notes applied to them.
Date
The transaction date from the transaction header.
Item
This is either a) in the case of Booking Transactions, the booking reference, or b) for non-bookings transactions, the transaction reference (invoice) number.
Reference
The transaction reference as generated by Tourplan, e.g. the invoice number.
Apply
This is the transaction number against which this transaction has been applied. For Invoice Transactions, Apply is always the same as Reference. For Credit Notes and Receipts, Reference is the Credit Note or Receipt Number and Apply is the Invoice Number that the Credit Note or Receipt applies to.
Tran
The types of transaction are:
- INV: Invoice
- RCT: Receipt
- CRD: Credit Note
- ALC: Allocated cash from Unallocated Receipt
- CHQ: Negative Receipt/Debtors Cheque
System generated transaction types relating to Foreign Currency variations will display after Forex processing has been run.
Currency
The currency of this transaction.
Amount
The amount of the transaction in the currency of the previous column.
Rate
The exchange rate used in the transaction to the system base currency.
Amount
The amount of the transaction in system base currency.
Age
The debtors accounting period into which this transaction will age.

|
To change details of a transaction double click on the Transaction Line. This can only be done provided the transaction is in an open period.
|
(continued in Debtors Transactions)
Open topic with navigation


 in the button bar. From the Insert Transaction screen displayed, select Credit Note.
 Credit Note Header Section


 ).
). ) will list invoices (in the Credit Note Header currency) that are available for credit.
 button at the very bottom of this screen which is not shown in


 ) for the line of 135.06 less the Cash Received (
 ) value of 84.59 = 50.47.
  Credits Applied (Display Only)
 Cash Received (Display Only)
 Credit Balance Flag (Checkbox)
 ) is 0.00, then the Credit Balance Flag is disabled.
 Description
 Quantities
 Commission
 Nett Value
 Tax Amount


 Output To (Radio Button)
 Use Document Format (Drop-down)

